
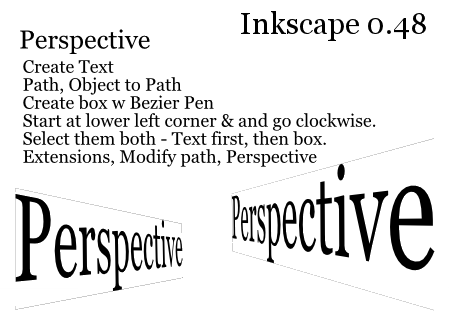
Text:
Create Text
Path, Object to Path
Create box border w Bezier Pen
Start at lower left corner & and go clockwise (4 nodes).
Select both, text first then border.
Extensions, Modify path, Perspective
Manual
Discusses how to tell what first node is and how to change that and the direction. I could not get that to work.
YouTube
An older version Inkscape, but still useful for Perspective. The tut starts about 1:42 into the video.
I tried making perspective text on a 3D box also.
Of course the node start and direction is not correct and I couldn't figure out how to change that.
So, what I did was to just make a box border with bezier pen tool again and go around the side of the 3d box that I wanted the text to go on. The process is the same as above.
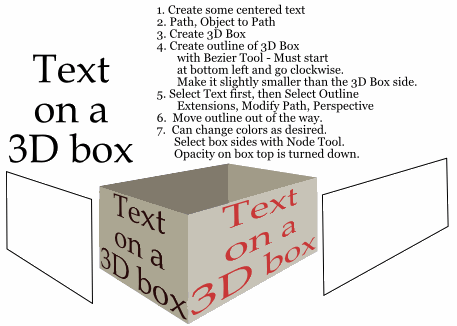
Text:
1. Create some centered text
2. Path, Object to Path
3. Create 3D Box
4. Create outline of 3D Box with Bezier Tool. Must start at bottom left and go clockwise (4 nodes). Make it slightly smaller than the 3D Box side.
5. Select Text first, then Select Outline, Extensions, Modify Path, Perspective
6. Move outline out of the way.
7. Can change colors as desired. Select box sides with Node Tool. Opacity on box top is turned down.
NOTE: I think Extensions/Modify Path/Envelop is supposed to do something similar to Perspective only it will warp an object to shape. Something to check out. I couldn't get it to work the way I wanted it to. Maybe it's the node start and direction issue again.
This video uses Bezier Envelope. Similar? (Extension for Inkscape version 0.48 at Flickr.) Mentions Envelope Deformation, which can be found under Path/Path Effect Editor. Manual Ref
5 comments:
Thanks for the explanation. It does something, inconsistently, but nothing that I can makes sense of and nothing as neat as the illustrations show. The text didtorts and is moved closely over the box. The first time it was toward the LHS and half way up. It didn't stretch either to the RHS of the box or to the top or bottom. It also overhung the box boundary. The second time the transformation was weirder still.
Third time lucky!! It works. Wow! If you don't succeed at first ... I have no idea what happened but happy that it did. :)
Thank you very much, I tried some other articles but could not make it work - this one was perfect!
Thanks a lot for this tutorial.
It was a really lucky shot to get here. I always did this with other programs, and had stroke with it in Inkscape. Almost thought it was impossible :D
Worked like a charm. Thanks for the tutorial!
Post a Comment