Sunday, March 11, 2007

Inkscape Rays


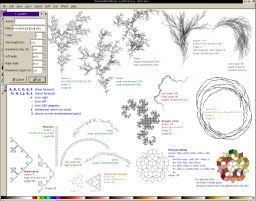
Rays were done with Inkscape Tiled Clones.
(I love that feature, can you tell?)

Ground? Jittered circle.
Birds? Calligraphy Tool.
Tree? Okay, I cheated and imported that.

How To:

Create One Ray
Used Guides for the ray and invisible rectangle.
Bezier/Pen Tool to make triangle (point down)
Yellow linear gradient fill, no stroke
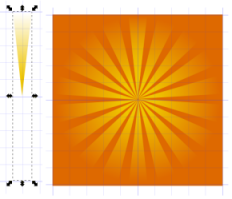
Used Gradient Tool to edit -- drag the white color node to top center and yellow colored node to bottom tip/point.

Tile Clones
Ray triangle must be grouped with an invisible rectangle (changes center point for rotation).
Create rectangle same width as triangle, but twice the length, no fill, no stroke.
Group rectangle and triangle - Select both, Object, Group

Edit, Clone, Create Tiled Clones
Symmetry is P1
1 Row, 18 Columns

Shift Tab:
Shift: X Per Column is -100% (that's minus)
Shift: Y Per Row is -100% (minus)
(Stacks clones on top of original.)

Rotation Tab:
Angle: 20 degrees Per column

The rest of the picture
Background is orange filled rectangle.
Birds created with Calligraphy Tool (default settings except size was 5).
Tree is a transparent png import.

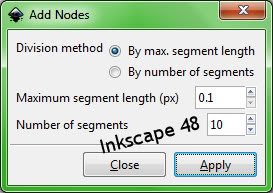
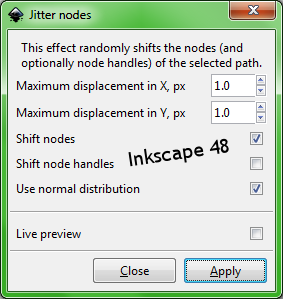
Ground is a circle, converted to path, add nodes, add jitter, stretch to size.
Specifics:
Circle size W234.052, H135.75 px
Path, Object to Path
Effects, Modify Path, Add Nodes 0.1
Effects, Modify Path, Jitter 1 (Shift nodes & Use normal distribution checked, Shift node handles unchecked)

Move the pieces around to get different looks.
That's all the further I went in Inkscape.
Did a print screen, pasted into Paint Shop Pro9 and cropped.

References:
Inscape Rays
(I think using tiled clones is easier.)

Photoshop Rays
(Just for more ideas.)

In Inkscape see Help, Tutorials, Tips and Tricks for the tiled clones part.

For jittered circle references see previous post here.

Tuesday, March 06, 2007

Inkscape - Mosaic


Got the idea from an Illustrator tut.

When I saw it, I thought of Tiled Clones in Inkscape right away and wanted to see if I could get something similar.

I tried the pixelate thing in Paint Shop Pro 9 (see above link) and that just made everything more complicated with worse results in Inkscape as far as I could figure out (broken clones, etc.).

In Inkscape:
I set preferences to import images as patterns automatically.
File, Inkscape Preferences, Misc, uncheck import image as bitmap.
(Just opening the image might work too, but I was working with an image pattern.)

So after importing the desired image pattern, I'm ready to set up for tiled clones.

Make a tiny circle/ellipse that will be used for tiling and place it at top left corner of image pattern.
My image size was 296W x 291H px and my circle was 9 H/W.

The circle fill/stroke:
fill = "unset paint" ("?" icon)
stroke = "no paint" ("x" icon )
OR
fill = "no paint"
stroke = 2 line width, then set to "unset paint"

Circle must be selected (Selection Tool)
Edit, Clone, Create Tile Clones
Click the Reset button
Symmetry Tab = P1
Enter width and height of image pattern

Shift Tab: (adds spacing)
Shift X Per Column is:
20 (if fill is unset paint)
or
40 (if stroke is 2 line width & unset paint)

Shift Y Per Row is:
20 or 40 (same as above)

Trace Tab: (clones colors of image pattern)
Trace the tiles under the tiles is checked
Pick from the drawing = color
Apply the value to the clones' = color
Click Create

Move the source images out the way, and you have the beautiful cloned mosaic vector.
I added a black background layer to mine.

Sunday, March 04, 2007

Inkscape - Spiral Mania


This is a combo of various techniques I've posted about already.

NOTES:
I noticed tons of keyboard combos that do different things with spirals.
I don't know if this applies to all shapes.
I just started noticing it now.
And I don't know if this is all of them.
If I find more, I'll add it here.

With Select Tool:
Ctrl/Shift/Drag arrow - scale around center (static center)
Ctrl/Drag arrow - resize & preserve aspect ratio (side opposite arrow drag is static)
Ctrl/Drag Spiral - a snap to thing happening
Shift/Drag arrow - twirl and/or stretch- Hor or Vert depending on arrow (static center?)
Drag arrow - twirls also but in a different way. (side opposite arrow is static)

Inkscape is a lot more powerful than at first glance.
The more I work with it, the more impressed I am.

UPDATE:
See Inkscape Spiral posted 2011.

Inkscape - Rain!


How To:
I fiddled with the nodes and morphed a circle shape into a raindrop and angled it.

(How? create long skinny circle shape, Path, Object to path, With the Node Edit Tool, Alt/drag nodes to sculpt them into a raindrop shape. Click twice on it with the Select Tool to angle it.)

Set Fill to "unset paint" ("?" icon), no stroke

Edit, Clone, Create Tiled Clones
Click Reset THEN

Symmetry: P1
8 Rows, 8 Columns

Shift Tab:
50% Random on both Shift Y and Shift X

Scale Tab:
50% Random on both Shift Y and Shift X

Color Tab:
Color is ff2727ff (default)
H: 16.7% on Per Row & Per Column

While you are there...
Make an explosion too.


Can use that same "raindrop" above:
Turn it so it's straight up and down skinny side down.
(Remember, fill must be set at "unset paint" or the coloring won't work.)

The "drop" gets placed inside top of an invisible rectangle.
So create a long skinny rectangle around the "drop", make it invisible (no fill or stroke).
Select both and Group (Object, Group)

Then Edit, Clone, Create Tiled Clones again.
Symmetry is P1
1 Row, 30 Columns

Shift Tab:
Shift: X Per Column is -100% (that's minus)
Shift: Y Per Row is -100% (minus)

Scale Tab:
50% Random on both Shift Y and Shift X

Rotation Tab:
Angle: 20 degrees Per column

Color Tab:
H: 50% random

Fiddle with the settings to get different explosions.

Reference for explosion:
In Inkscape - Help, Tutorials, Tips and Tricks

Inkscape Tutorials, Videos

Some Inkscape tutorials I want to reference here.

Swirly curls in Inkscape
This one is not for newbies. I found it difficult to follow until I had learned more about Inkscape.

Inkscape Blur FilterTut
Haven't worked thru this one yet.

Videos:
Photo Popout
And more at that link. I think he's a convert from WindowsXP to Linux Ubuntu.

Interesting to watch someone work in Inkscape.
I found out another way to skew--if an object is converted to Path, the Node Tool will skew.
With a photo, though, I think you have to make it a pattern, use it as a fill for an object then convert the object to path. That's the way it is on the video anyway.
I never thought of making a pattern of a picture and using that instead of the picture.
(See Help, Tutorials, Tips and Tricks.)
(Automate it: File, Inkscape Preferences, Misc, Uncheck Import Image as Bitmap.)

The pattern within rectangle behavior is different with the Node Tool than the Select Tool.
Resize with Select tool, the pattern is fixed.
Resize with the Node tool, the pattern is dynamic. Can rotate the pattern within the rec with that little, ah...round nodule whatchamacallit. :)

I did run into glitches with the Windows version of Inkscape again, so I couldn't finish the tut.
Path, Union makes the pattern flip around inside its rectangle. It looks like the pattern is sliced and flipped sometimes. Other times just flipped. Path, Exclusion does this too. Maybe anything under the Path menu? It doesn't matter what Tool either.

NOTE: Selecting both objects in Windows version is Shift/click not Ctrl/click.
The key combos are different. I'm running into that quite a bit. Must be different versions of Inkscape use different keyboard combinations.

Friday, March 02, 2007

Inkscape - Paint Brush!


How to:
1. Draw a tiny circle/ellipse and keep it selected
2. Path, Object to Path
3. Effects, Modify Path, Add Nodes 0.1
4. Effects, Modify Path, Jitter 5 (Shift nodes & Use normal distribution checked, Shift node handles unchecked)
5. Draw a curvy line (I used the Freehand Tool)
6. Select both objects (circle, line)
7. Effects, Generate from Path, Pattern along Path
Single, stretched
Snake
Space between copies 4
Normal offset 4
Tangential offset 0
Pattern is vertical unchecked
duplicate the pattern before deformation checked

Gallery of effect:
Link
png

See previous post on Pattern Along Path

UPDATE:
See Inkscape Spiral posted 2011.

UPDATE2: Apr 2011 for Inkscape 0.48 Per Comments:

100% zoom.
Curvy Pencil line is about 200 px long.
Circle is 20x20 px in size. (Then Object to Path.)

Add Nodes:


Select circle with Select/Transform Tool and at the bottom Statusbar it tells you the number of nodes. I got about 634 nodes and that did the job. So don't worry about getting 1024 nodes. You want enough nodes to get the lacey/jagged/ragged edges on the circle when you add Jitter. Plus you'll be stretching that pattern onto a path.

Jitter:

Zoom in to about 500% to see what the edges of the circle look like. Should be jagged.

Note: Circle must be Top Most Object (Object, Raise to Top) when you select both circle and line and apply Pattern Along Path.

Here's a screenshot of Pattern Along Path setting that works (slightly different than above):


Refer to my update link above for further relevant notes applicable to Inkscape v 0.48.

Inkscape - Tools, Dropper Tool

The Dropper Tool or "pick averaged colors from image" doesn't work the way it's supposed to.
Ignore the tips on that one--online, on screen, within Inkscape, wherever.

Here's how it works in Windows version of Inkscape 0.45:

1. Select the object you want to modify
2. Click on the dropper tool
3. Pick alpha is checked, Set alpha is unchecked, at top screen toolbar (alpha = opacity)
5. DRAG on the color you want.

Alt/Drag gives the inverse color -- kinda weird, I thought, who wants the inverse color and what is it?

"Inverse" is the same thing as creating a negative image in graphic editors.
(Adjust, Color Balance, Negative Image in PSP9)
Get inverse color online here.

How to change stroke color? Didn't figure that out.

References:
Online Manual Dropper Tool

Tools in Inkscape with name and mouse hover popup text:


See Help, Keys and Mouse.

Inkscape - Notes

This is a notes-to-myself work in progress and will be edited.

Masks/Feathered Edges
Place a blurred white filled object on top of the area you want masked/feathered.
Select both
Object, Mask, Set

Turn off the mask/feather:
Object, Mask, Release
(Source: Release notes.)

Stamping
With the Select Tool start to drag the object (arrows will disappear),
then while still holding down mouse button,
mouse drag/spacebar to create stamp.
Holding down spacebar will create a steady line/stream of stamps --overlapping if you drag slow.
I practiced on a very small star to see how it worked.

Bookmark file directories for quick access.
File, Open dialogue, select directory you want, click on the Add button.
Bookmarks are listed way at the bottom left hand side of screen.

Automatically import images as patterns rather than bitmaps.
File, Inkscape Preference, Misc, Uncheck import bitmap as image.
(See Help, Tutorials, Tips and Tricks.)

Save, Save, Save, and did I mention Save?
Inkscape crashes quite often when I'm experimenting with different effects.
It can be a memory hog too. (How much is stored in the Undo History? Can't clear it.)

Edit, Undo History
(Like the History Palette in PSP9)

Default template opens in small window, at 35% zoom, with page borders. Yuk!
Template location:
Inkscape/Share/Templates/Default.svg
Open template in Inkscape, make changes, resave. (I saved a copy of the original.)
(At first, when I was completely clueless, I was working at that zoom and then realized how this was affecting memory and file size if I was working on gigantic images, duh.)

File Sharing

I can preserve layer transparency and open in PSP9
IF
File, Export with a png extension

Preserving vector info is another story.
svg imports in PSP9 (Paint Shop Pro 9) doesn't preserve transparency or vector data, although I can pick a size.
Inkscape's SaveAs offers an emf file type which would preserve both transparency and vector data.
I can import emf's in PSP9, but this particular emf type makes PSP9 crash when I try to edit the vectors.

PgUp and PgDown on an object will change it's stacking order (Z-order) with the other objects in the document. (See Help, Tutorials, Basics)

Reminder: Read popup tips at bottom of the screen
Change Fill/Stroke from there

F: and S: at bottom left screen
Left click = Fill/Stroke Menu
Right click = more options popup

Left Click on a color in the color palette at the bottom will change a selected object's Fill color.
Shift/Click changes Stroke color.

+/- keys = Zoom in/out

Clipboard
Copy/Paste from another application works for Text Tool.
No copy/paste screenshots, no copy/paste images from outside applications.
Have to save it in another application, then File, Import within Inkscape.


Some Keyboard Commands with Selection Tool:

On a selected shape (Select Tool)
Ctrl/Drag an arrow preserves aspect ratio when resizing.

Keyboard move, rotate with Selection Tool
[ - rotate left 15%
] - rotate right 15%

Ctrl/[ - rotate left 90%
Ctrl/] - rotate right 90%

Alt/[ - rotate left slow px
Alt/] - rotate right slow px

arrow keys - move 2px
Shift/arrow keys move 20px

< - scale down
> - scale up

Also try:
Shift/>
Shift/<
(Shift seems to do the same thing as plain < or > in Windows version of Inkscape?)

Ctrl/>
Ctrl/<
(Scaling at 50% maybe?)

With Selection Tool
Drag a corner of an object - rotation around opposite corner
Shift/drag corner - rotate around center
(Just the opposite in "Tip and Tricks" - another example of keyboard combination inconsistencies.)

Thursday, March 01, 2007

Inkscape - Tiled Clones


This was a tough one to create. Took me quite a while fiddling with the settings to finally make it work.

Part of the secret is using the right kind of spiral and star. Make the star very small. Spiral shouldn't be too complicated.


Spiral: Set Stroke to "no paint"
Star: Set Fill to "unset paint" (click "?" Fill Menu)
Select both
Object, Group

Edit, Clones, Create Tile Clones
P1 Symmetry
2 Rows, 20 Columns

-100% Shift on:
Per row/Shift Y
Per column/Shift X

Scale Tab
Per column Scale X and Y both at 30%

Column Rotation
30 deg per row
60 deg per col

Color Tab:
Initial Color: ff2727ff (bright red)
H: 10% per row, 10% per col

References:

In Inkscape see Help, Tutorials, Tips and Tricks, Radial placement with Tile Clones.
Online Manual Tiling Tricks

I haven't figured out the spread out spiral tiling yet (above link).
If/when I do, I'll post it.
(UPDATE See 14 Feb 2011 post here.)

Note: Noticed later that if I click twice on a spiral or any object with the Select Tool so it's in rotation mode, there is a crosshair. I think the crosshair indicates the "center of bounding box" that the online manual talks about.

Inkscape - LSystem Effect


Effects, Render, L-System
web page
png

I did get these to work--after I figured out the missing parameters that aren't mentioned. They all have to have a Step and Order specified, duh.

Step 4 can be used on all the Axiom F and Axiom ++F illustrations
Step 8 on Axiom FX (Order is specified on png)
Step 25, Order 3 on Koch curve
Step 25, Order 10 on Meander
Step 25 on Sierpinski triangles (Order is specified on png)
Step 50, Order 3 on the Penrose. (Step 50 is good size to try.)
Step 5 on Dragon curve fits on regular size paper. (Order is specified on png)

I think step 25 may be fairly large? But good place to start on the simple patterns so you can see what they look like close up.
(Inkscape loads at 35% view on default which is really too small. I have changed that now. Edit default.svg in inkscape/share/templates directory.)

Gotta tweak the nodes on the Penrose. It isn't perfect. No biggie.
Coloring instructions work on some of it.

I printed out the png example and then typed and saved the rules in a word processor for copy/paste because some are quite lengthy. Too bad a person can't save these as presets.

Default is lost when changing parameters.


Koch's Snowflake pattern at Inkscape online manual.

Parameters are Order 3, Angles 60, Axiom F++F++F, Rules F=F-F++F-F.
Try Step 25.

Inkscape - Node Sculpting Spirals

Here's what I did with a spiral using node sculpting. I saw the idea in a gallery pic (link below.)


How I did it:

Create Spiral


Spiral is selected, then
Path, Object to Path
Edit, Select/All
Alt/Drag 1st Center Node Down.
The whole thing should stretch out like a spring, if all the above steps were done correctly.
The spiral is vertical at this point, horizontal later.

I tried making and applying a gradient to the spiral, but the colors ran vertically and I wanted them horizontal.
So, I found an image that had color gradients the way I wanted them.
File, Import that image in Inkscape.
Select it.
Objects, Pattern, Objects to Pattern
Pattern will show up in the Fill/Stroke area and you can apply it to the spiral there.
(Note: Vertical to Horizontal gradients - can use Gradient Tool.)

THEN
I wondered how the spiral would look if it was laying on its side rather than up and down.
I could have gone back thru all the above steps and dragged it sideways instead of down.
But I skewed it instead.
Objects, Transform, Skew Tab Horizontal and Vertical at 50 deg, applied twice.
Can resize, stretch, add drop shadow, try a different stroke.
But in the end, I liked the one above the best.

References:
Wiki Node Sculpting

Gallery of effect:
web page
png