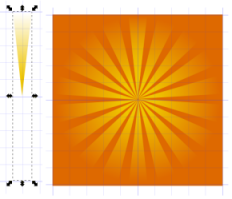
Rays were done with Inkscape Tiled Clones.
(I love that feature, can you tell?)
Ground? Jittered circle.
Birds? Calligraphy Tool.
Tree? Okay, I cheated and imported that.
How To:
Create One Ray
Used Guides for the ray and invisible rectangle.
Bezier/Pen Tool to make triangle (point down)
Yellow linear gradient fill, no stroke
 Used Gradient Tool to edit -- drag the white color node to top center and yellow colored node to bottom tip/point.
Tile Clones
Ray triangle must be grouped with an invisible rectangle (changes center point for rotation).
Create rectangle same width as triangle, but twice the length, no fill, no stroke.
Group rectangle and triangle - Select both, Object, Group
Edit, Clone, Create Tiled Clones
Symmetry is P1
1 Row, 18 Columns
Shift Tab:
Shift: X Per Column is -100% (that's minus)
Shift: Y Per Row is -100% (minus)
(Stacks clones on top of original.)
Rotation Tab:
Angle: 20 degrees Per column
The rest of the picture
 Background is orange filled rectangle.
Birds created with Calligraphy Tool (default settings except size was 5).
Tree is a transparent png import.
Ground is a circle, converted to path, add nodes, add jitter, stretch to size.
Specifics:
Circle size W234.052, H135.75 px
Path, Object to Path
Effects, Modify Path, Add Nodes 0.1
Effects, Modify Path, Jitter 1 (Shift nodes & Use normal distribution checked, Shift node handles unchecked)
Move the pieces around to get different looks.
That's all the further I went in Inkscape.
Did a print screen, pasted into Paint Shop Pro9 and cropped.
References:
Inscape Rays
(I think using tiled clones is easier.)
Photoshop Rays
(Just for more ideas.)
In Inkscape see Help, Tutorials, Tips and Tricks for the tiled clones part.
For jittered circle references see previous post here.

2 comments:
Love it! Great drawing.
No need for invisible rectangle, just move the center of rotation for the triangle (in rotate mode).
Post a Comment