The new Inkscape version 0.46 for Windows just came out this month of April. I downloaded and installed it over the weekend, so I am preoccupied with that.
Wow, things have changed since I last was into Inkscape.
I'm hunting down relevant links and comparing old to new versions to see what's new. A LOT, evidently.
Inkscape
Inkscape 0.46 Release Notes
Screenshots
Tutorial listings
Inkscape Forum
Inkscape 0.45 Manual
New Section on 0.46 Filters
I don't think I ever blogged this clock, made by the same person who wrote the manual.
Clock
An svg file version of the clock is included with Inkscape software in Inkscape\share\examples, but the link above displays it animated within Firefox browser.
Also look in Drawings folder for more stuff.
There is an Inkscape tutorial blog now, yay.
Inkscape Tutorials Blog
I see there's a tiled clone mosaic tut there like the one I did a while back, here.
(Tile Clones - MuRa's Meister Copies free plugin will do something similar in Paint Shop Pro. No link, Google it.)
Downloadable Video Tutorials
Episode 058 - Filter Effects
Wow. There's no way I'd figure that out on my own. Read the comments and you'll find an *.svg file that has a bunch of effects examples in it. Nice!
More Inkscape Examples
(Sort by age and you'll find the effects example file listed on top,
filename: inkscape_filters.svg)
Episode 049 - Sunbursts
I created rays with tiled clones here.
This video is a lot more detailed than I went into, but I see it has the same core idea of using tiled clones.
A bunch of gradients
I think they are just GIMP gradients *.ggr so might be easily available elsewhere on the Net where the GIMP people hang out.
Import within Inkscape via File, Import.
You want zipped file: ggr-grads-0_4c.7z (I unzipped with TUGZip.)
There's also a previews pdf file: ggr-grads-preview-0_4.zip
Well, I'll be busy with Inkscape for a while.
Will probably post more stuff for future reference.

Tuesday, April 22, 2008
Friday, April 11, 2008
My Aurora - Northern Lights
If I study enough tutorials, eventually, it all comes together and produces something I like.
I've been studying lighting effects using Dodge layer blend for a l-o-n-g time and finally am starting to understand it.
Reference: Light Effects Tuts List
My Aurora:
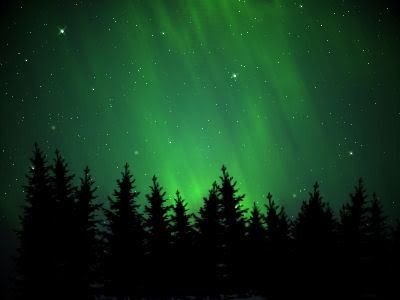
How I did it:
Layer1
Background layer needs to be a dark sunburst gradient.
I had black with a very dark blue sunburst and the blue does slightly show thru the layers on the finished product. Make sure the blue is very dark almost black because when adding layers using dodge it can get too harsh bright. (I don't think plain black fill will work with the aurora dodge layer above it. Try it. Won't see the aurora layer.)
Reference: Lighted Coffee Cup Tut
Layer 2
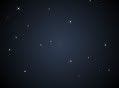
Fine stars
fill black, add noise, levels, layer blend is Screen
Reference: Supernatural Text Effect Tut
My blog post on that.
Layer 3
Big stars
Ulead, Particle free plugin (google it), Stars Effect, tweak settings to get effect you want, layer blend is Screen.
Reference: Galaxy Tut
Layer 4
The aurora lights look was a multiple step process.
It was when I was working thru this MSNBC Effect Tut that I came up with a method of my own for making those light lines.
Note: The Render Fibers, Motion Blur effect look can be made in Paint Shop Pro by using any black and white pattern and applying the Offset Effect to pull the colors down and make stripes.
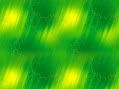
Step 1
OR

Fill with gradient or whatever colors you want.
I used an old PSP pattern called bright emerald. I could also make a similar pattern effect by making a linear gradient fill using two tones of green, and then using a textured brush (small bristles hard brush tip) to add some yellow.
(Note: The small bristles hard brush tip is great for painting on a dodge layer blend.)
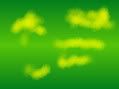
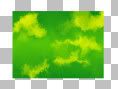
Step 2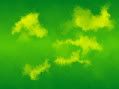
Mess up the color fill with the Warp Brush Cloud Preset. (This will soften and blend the colors so they aren't too harsh with Dodge layer blend.)
Reference: Quick Cloud Effect Tut
Step 3
Make a selection, invert, and delete the outer edges.
Step 4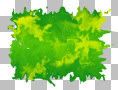
Use Displacement Maps to get ragged messy edges. It doesn't really matter what setting, pick a rough texture to make it nice and bumpy, hit the random button till you get some messy edges.
Reference: Infinite Borders Tut
My blog post on that.
Step 5
Add Motion blur
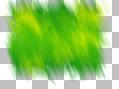
Step 6
Use the Deform Tool to stretch it out.
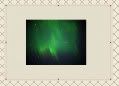
Step 7
Layer blend is Dodge
Layer 5
The top layer contains the black evergreens. I had an evergreen brush tip I used. I set the Brush Variance (F11) to Size Jitter 31 and Rotation Jitter 5. This varied the tree size and angle as I applied the brush.
(Note: I had this layer already made when working on the aurora layer. It helped to see what the final effect would be once the trees were added. I moved the aurora layer around until I got the look I wanted.)
I've been studying lighting effects using Dodge layer blend for a l-o-n-g time and finally am starting to understand it.
Reference: Light Effects Tuts List
My Aurora:
How I did it:
Layer1
Background layer needs to be a dark sunburst gradient.
I had black with a very dark blue sunburst and the blue does slightly show thru the layers on the finished product. Make sure the blue is very dark almost black because when adding layers using dodge it can get too harsh bright. (I don't think plain black fill will work with the aurora dodge layer above it. Try it. Won't see the aurora layer.)
Reference: Lighted Coffee Cup Tut
Layer 2
Fine stars
fill black, add noise, levels, layer blend is Screen
Reference: Supernatural Text Effect Tut
My blog post on that.
Layer 3
Big stars
Ulead, Particle free plugin (google it), Stars Effect, tweak settings to get effect you want, layer blend is Screen.
Reference: Galaxy Tut
Layer 4
The aurora lights look was a multiple step process.
It was when I was working thru this MSNBC Effect Tut that I came up with a method of my own for making those light lines.
Note: The Render Fibers, Motion Blur effect look can be made in Paint Shop Pro by using any black and white pattern and applying the Offset Effect to pull the colors down and make stripes.
Step 1
OR
Fill with gradient or whatever colors you want.
I used an old PSP pattern called bright emerald. I could also make a similar pattern effect by making a linear gradient fill using two tones of green, and then using a textured brush (small bristles hard brush tip) to add some yellow.
(Note: The small bristles hard brush tip is great for painting on a dodge layer blend.)
Step 2
Mess up the color fill with the Warp Brush Cloud Preset. (This will soften and blend the colors so they aren't too harsh with Dodge layer blend.)
Reference: Quick Cloud Effect Tut
Step 3
Make a selection, invert, and delete the outer edges.
Step 4
Use Displacement Maps to get ragged messy edges. It doesn't really matter what setting, pick a rough texture to make it nice and bumpy, hit the random button till you get some messy edges.
Reference: Infinite Borders Tut
My blog post on that.
Step 5
Add Motion blur
Step 6
Use the Deform Tool to stretch it out.
Step 7
Layer blend is Dodge
Layer 5
The top layer contains the black evergreens. I had an evergreen brush tip I used. I set the Brush Variance (F11) to Size Jitter 31 and Rotation Jitter 5. This varied the tree size and angle as I applied the brush.
(Note: I had this layer already made when working on the aurora layer. It helped to see what the final effect would be once the trees were added. I moved the aurora layer around until I got the look I wanted.)
Subscribe to:
Posts (Atom)