How to:
1. Draw a tiny circle/ellipse and keep it selected
2. Path, Object to Path
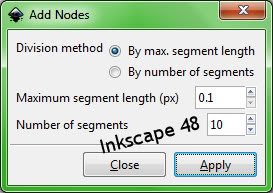
3. Effects, Modify Path, Add Nodes 0.1
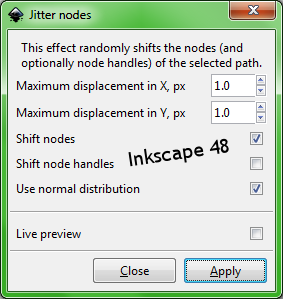
4. Effects, Modify Path, Jitter 5 (Shift nodes & Use normal distribution checked, Shift node handles unchecked)
5. Draw a curvy line (I used the Freehand Tool)
6. Select both objects (circle, line)
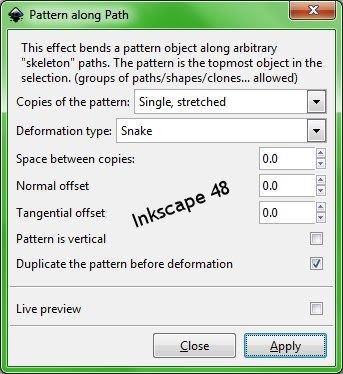
7. Effects, Generate from Path, Pattern along Path
Single, stretched
Snake
Space between copies 4
Normal offset 4
Tangential offset 0
Pattern is vertical unchecked
duplicate the pattern before deformation checked
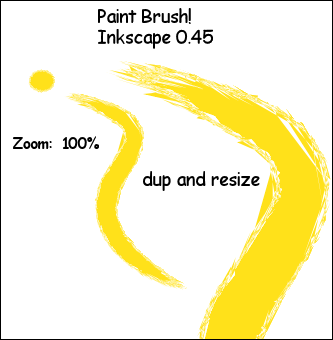
Gallery of effect:
Link
png
See previous post on Pattern Along Path
UPDATE:
See Inkscape Spiral posted 2011.
UPDATE2: Apr 2011 for Inkscape 0.48 Per Comments:
100% zoom.
Curvy Pencil line is about 200 px long.
Circle is 20x20 px in size. (Then Object to Path.)
Add Nodes:

Select circle with Select/Transform Tool and at the bottom Statusbar it tells you the number of nodes. I got about 634 nodes and that did the job. So don't worry about getting 1024 nodes. You want enough nodes to get the lacey/jagged/ragged edges on the circle when you add Jitter. Plus you'll be stretching that pattern onto a path.
Jitter:

Zoom in to about 500% to see what the edges of the circle look like. Should be jagged.
Note: Circle must be Top Most Object (Object, Raise to Top) when you select both circle and line and apply Pattern Along Path.
Here's a screenshot of Pattern Along Path setting that works (slightly different than above):

Refer to my update link above for further relevant notes applicable to Inkscape v 0.48.

3 comments:
Hi Marilyn,
I'm trying to do this Paint Brush effect but not having much luck!
I think the problem starts with 'Add Nodes'.
What should be selected for Division Method?
What should be the max segment length?
Number of segments?
I'm confused by the comment in your pdf link where you said you added 1024 nodes - this isn't shown in your instructions.
Your help will be greatly appreciated.
Thanks
Jaime
Hi Jaime,
I'll add some screenshots of the settings to the main post area.
Hope that helps you.
Marilyn
thanks for the detailed explanation!
Post a Comment