
3D Boxes Tool has been in Inkscape since version 0.46, but I've never blogged about it.
I like to document things I learn for later reference.
Screenshot Image: All boxes selected, Outline View, Page Border On, All boxes have the same Vanishing Points (VPs), Y VP is infinite (blue lines), X and Z VPs are finite. That's 2 point perspective.
All 3D boxes created on screen have the same Vanishing Points (VPs) by default.
It's as if you are creating one "scene" or structure from the same perspective.
If a box is moved with the 3D Tool, the VPs stay the same.
That means the box changes shape and size as you move it around on the screen.
Holding the Shift key down while moving a Vanishing Point will effect just the selected box or boxes.
If a box is moved with the Tool Pointer, the box gets independent Vanishing Points.
I always forget to read the context sensitive help text that pops up at the bottom of the screen on the Status Bar.
Move mouse cursor over the various points on the box and read the help text.
If you just happen to draw that first box *anywhere* on the screen, the box can act and look really strange. "Normal" perspective must be within the Page Border boundaries. (View, Document Properties, Show Page Border - On by default.) I usually have Page Borders shut off. Try creating a box with part of it outside and part of it inside the Page Border. lol
Try making several 3D boxes at different areas on the screen which will all have the same VPs by default. The further away you get from "normal" box, the more distorted the boxes get. Then drag a Vanishing Point (with 3D Tool). Whoa. Vertigo. lol All the boxes change. That's kinda fun. A good way to learn about perspective.
I found 3D boxes difficult to work with on a small screen. Vanishing Point ends are far away from the box, which makes sense, but makes it difficult to edit. Have to zoom in and out a lot.
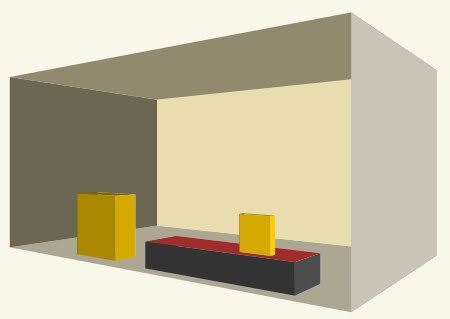
Some sample boxes I made:
LINKS:
Here's basic info tut.
Official Manual on 3D Boxes.
NOTE: Fill/Stroke color is shown on Tools Control Toolbar. Mine says "None" for both Fill and Stroke. Have to use the Node Tool for coloring in my Windows 7 version (mentioned below). (Ctrl/Click with the Pointer Tool also works.)
I tried walking thru this
3D first-aid kit tutorial (Apr 2010).
I got stuck at step 2. Not for newbies.
Step 2:
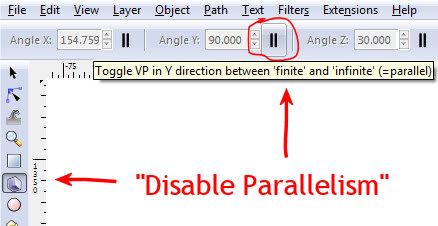
"disable parallelism of edges, position the object the way we need it, define final size and change colors."
Okie dokie...Five hours later...lol...
My NOTES:
That little icon button on right side of Angle Y on the Tools Control Toolbar "disables parallelism" or sets Vanishing Point (VP) to finite. (Angle Y is set to infinite VP by default. Toggle On/Off with that little icon button.)
Pull Angle Y down toward bottom of box.
The other two vanishing points got flipped? (Angle X and Z)
Object, Flip Horizontal?
Select a side to color with the Node Tool. (Or Pointer Tool Ctrl/Click.) That's also how to make a side transparent (no color).
Step 3:
Objects, Ungroup
View, Display mode, Outline
Alt/Click to select and delete sides you don't "see."
Good luck with that.
But hey, Ungroup is how to take the lid off the box or remove the wall from the room, etc. (Could also set to no color.)
I didn't know about the Outline View. That's how it would look if you were drawing it out on paper with pencil and ruler by perspective.
It all went downhill from there and I quit.
I didn't understand what duplicating the box was supposed to do.
Union made the box turn dark blue.
My Guides were way more complicated than what the tut showed.
I didn't want to fiddle with rounding and gradients and finishing.
1 comment:
Thanks for this post. It has helped me to control 3D Boxes in a more comfortable manner. The funny thing is that you don't even need to manually move the guides, you can simply adjust the x y z numbers on top of the window to have your objects move with more precise control. Very cool.
Post a Comment