Wednesday, August 29, 2007

"Smoke" On The Water

My first attempt at taking photographs of fog.


Smoke on the water... at hypemachine.

From Wiki:
The "smoke on the water" that became the title of the song referred to the smoke from the fire spreading over Lake Geneva from the burning casino as the members of Deep Purple watched the fire from their hotel across the lake.

Search YouTube
Whoa, check this one out: Deep Purple Live
Almost 9 minutes long.

Silhouette

An opportunity to try a silhouette.

A New Trail

A new trail to explore.
Yippy Skippy.

Thursday, August 23, 2007

Guess What This Is

Betchya can't guess what this is...


It looks like a wooden flower.

Okay, here's the obvious hint.


Trio - I plopped three of them on a fence post, to get a blurry background.


I might go back to the scene and try again to get a good shot of the cones in the tree. I actually had too much light for this shoot (surprised me) and the cones tended to be overexposed.

More Fuzzies

I'm into these fuzzies (flowers/weeds gone to seed). They're everywhere too.

Hangin' On


Falling Apart


Softy

Best High Contrast Photo

This represents my best exposure on a high contrast scene.

Saturday, August 18, 2007

Here Today Gone Tomorrow


Tree moss.
Fabulous yummy texture, and yes, it really was this pretty green color.
The next day, it was gone.

Where's My Mama?

The fawn was grazing speedily in the back yard today, so I got in a photo shoot thru the window...


He's such a high energy creature, just a busy moving here and there. It's hard to catch him in a still pose. But then all of a sudden he paused and looked back as if to say "where's my mama?" before scurrying back into the trees to find her.

Friday, August 17, 2007

Always Take Your Camera With You

I almost didn't take my camera with me during my morning workout. But I did and then I decided to go a bit further than usual. Came to a little brook or whatever you'd call it and paused considering taking a shot and...

Look who flew in for the photo shoot as I stood there...


That is at full zoom, hand held, no post-processing, early morning.

I think this is a Cooper's Hawk Juvenile.

I was so excited I was shaking. Okay, BREATHE, turn on the camera, hold steady, hold breath, shoot.

Here's a no zoom full size crop:


And just to give you an idea of place, here's the entire scene no crop resized to fit my blog.


I just stood there and kept taking photos for as long as I could.
Got 6 pics of him before he flew away.
3 blurry throw aways and 3 keepers out of the bunch.

That was the ONLY thing that showed up interesting that day.
WOW.

The Last Hurrah

I'm not sure what kind of weed/plant this is. But the flowers had gone to seed and become this fluffy white ball, kinda like the dandelion does. I zoomed in and...


I call it "The Last Hurrah."

Here's a Dandelion fuzz ball.


Intricate little thing ain't it.

Monday, August 13, 2007

Sexy - Photo and Music

These flowers (lilies?) are so NOT this red! I cannot get an accurate color on these with my camera. I tried. They are really a quiet muted wine color. I had not noticed how heavy they were with pollen until I looked at the photos.


Here's a full sized crop of the stamens heavy with pollen and pistil.


LINK
Plant Physiology

SONG
Birthday Song, by Abra Moore

For you are so beautiful
You are so wild
You are so young
Could you stay the way you are
You don't have to carry
This world on your shoulders
This life can be scary
When you get older...

Search YouTube for Abra
I also like songs: Four Leaf Clover, I Believe.

NOTE: I think the flower is a daylily.
Possibly: Ruby Stella or Pardon Me

This flickr user captured a daylily with more of that wine color I was going for, only more vivid.

Rocks and Water - Photo and Music

A study in shutter speed and running water.
Rock water fountain.


1/20 shutter speed gave this running water a smooth look.
This shot is fabulous at full size. (I think so, anyway.)
The colors and textures are so yummy!
I have no place to put large images online yet.
Optimized it too, to keep the file size down, so lower quality.
I'm feeling so limited lately. :)

Here's a close up snip of the above image. Not optimized.


SONG
Rocks And Water, by The Weepies
youtube
grooveshark

Seven times I went down
Six times I walked back.
And I don't fear the dark anymore
'Cause I'm become all that.
all that
all that
all that

I will be rocks, I will be water
I will leave this to my daughter
Lift your head up in the wind
When you feel yourself grow colder
Wrap the night around your shoulders
and I will be with you even then
even when I cannot see your face anymore

Don't forget the time
I wooed him with red wine.
The devil he wore such a fine, fine shirt
And it stayed so clean while he dragged me through the dirt
Now, honey, don't trust anyone who looks you in the eye
Don't take any kindness, it's a demand in disguise

Chorus

I have seen such things child
I have seen
I have seen
I have seen
such things, child
on this, and the other side.
Words cannot show you
the midnight owl it does not know you.
You will see for your sweet self
by and by.

Chorus

I will be rocks, I will be water.
I will leave this to my daughter:

Together Alone

Wild sunflowers.

Alone


Together


Together Alone


Sad But Hopeful


With each ending comes a new beginning.

Sunday, March 11, 2007

Inkscape Rays


Rays were done with Inkscape Tiled Clones.
(I love that feature, can you tell?)

Ground? Jittered circle.
Birds? Calligraphy Tool.
Tree? Okay, I cheated and imported that.

How To:

Create One Ray
Used Guides for the ray and invisible rectangle.
Bezier/Pen Tool to make triangle (point down)
Yellow linear gradient fill, no stroke
Used Gradient Tool to edit -- drag the white color node to top center and yellow colored node to bottom tip/point.

Tile Clones
Ray triangle must be grouped with an invisible rectangle (changes center point for rotation).
Create rectangle same width as triangle, but twice the length, no fill, no stroke.
Group rectangle and triangle - Select both, Object, Group

Edit, Clone, Create Tiled Clones
Symmetry is P1
1 Row, 18 Columns

Shift Tab:
Shift: X Per Column is -100% (that's minus)
Shift: Y Per Row is -100% (minus)
(Stacks clones on top of original.)

Rotation Tab:
Angle: 20 degrees Per column

The rest of the picture
Background is orange filled rectangle.
Birds created with Calligraphy Tool (default settings except size was 5).
Tree is a transparent png import.

Ground is a circle, converted to path, add nodes, add jitter, stretch to size.
Specifics:
Circle size W234.052, H135.75 px
Path, Object to Path
Effects, Modify Path, Add Nodes 0.1
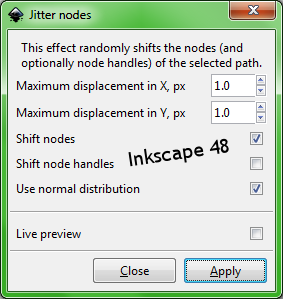
Effects, Modify Path, Jitter 1 (Shift nodes & Use normal distribution checked, Shift node handles unchecked)

Move the pieces around to get different looks.
That's all the further I went in Inkscape.
Did a print screen, pasted into Paint Shop Pro9 and cropped.

References:
Inscape Rays
(I think using tiled clones is easier.)

Photoshop Rays
(Just for more ideas.)

In Inkscape see Help, Tutorials, Tips and Tricks for the tiled clones part.

For jittered circle references see previous post here.

Tuesday, March 06, 2007

Inkscape - Mosaic


Got the idea from an Illustrator tut.

When I saw it, I thought of Tiled Clones in Inkscape right away and wanted to see if I could get something similar.

I tried the pixelate thing in Paint Shop Pro 9 (see above link) and that just made everything more complicated with worse results in Inkscape as far as I could figure out (broken clones, etc.).

In Inkscape:
I set preferences to import images as patterns automatically.
File, Inkscape Preferences, Misc, uncheck import image as bitmap.
(Just opening the image might work too, but I was working with an image pattern.)

So after importing the desired image pattern, I'm ready to set up for tiled clones.

Make a tiny circle/ellipse that will be used for tiling and place it at top left corner of image pattern.
My image size was 296W x 291H px and my circle was 9 H/W.

The circle fill/stroke:
fill = "unset paint" ("?" icon)
stroke = "no paint" ("x" icon )
OR
fill = "no paint"
stroke = 2 line width, then set to "unset paint"

Circle must be selected (Selection Tool)
Edit, Clone, Create Tile Clones
Click the Reset button
Symmetry Tab = P1
Enter width and height of image pattern

Shift Tab: (adds spacing)
Shift X Per Column is:
20 (if fill is unset paint)
or
40 (if stroke is 2 line width & unset paint)

Shift Y Per Row is:
20 or 40 (same as above)

Trace Tab: (clones colors of image pattern)
Trace the tiles under the tiles is checked
Pick from the drawing = color
Apply the value to the clones' = color
Click Create

Move the source images out the way, and you have the beautiful cloned mosaic vector.
I added a black background layer to mine.

Sunday, March 04, 2007

Inkscape - Spiral Mania


This is a combo of various techniques I've posted about already.

NOTES:
I noticed tons of keyboard combos that do different things with spirals.
I don't know if this applies to all shapes.
I just started noticing it now.
And I don't know if this is all of them.
If I find more, I'll add it here.

With Select Tool:
Ctrl/Shift/Drag arrow - scale around center (static center)
Ctrl/Drag arrow - resize & preserve aspect ratio (side opposite arrow drag is static)
Ctrl/Drag Spiral - a snap to thing happening
Shift/Drag arrow - twirl and/or stretch- Hor or Vert depending on arrow (static center?)
Drag arrow - twirls also but in a different way. (side opposite arrow is static)

Inkscape is a lot more powerful than at first glance.
The more I work with it, the more impressed I am.

UPDATE:
See Inkscape Spiral posted 2011.

Inkscape - Rain!


How To:
I fiddled with the nodes and morphed a circle shape into a raindrop and angled it.

(How? create long skinny circle shape, Path, Object to path, With the Node Edit Tool, Alt/drag nodes to sculpt them into a raindrop shape. Click twice on it with the Select Tool to angle it.)

Set Fill to "unset paint" ("?" icon), no stroke

Edit, Clone, Create Tiled Clones
Click Reset THEN

Symmetry: P1
8 Rows, 8 Columns

Shift Tab:
50% Random on both Shift Y and Shift X

Scale Tab:
50% Random on both Shift Y and Shift X

Color Tab:
Color is ff2727ff (default)
H: 16.7% on Per Row & Per Column

While you are there...
Make an explosion too.


Can use that same "raindrop" above:
Turn it so it's straight up and down skinny side down.
(Remember, fill must be set at "unset paint" or the coloring won't work.)

The "drop" gets placed inside top of an invisible rectangle.
So create a long skinny rectangle around the "drop", make it invisible (no fill or stroke).
Select both and Group (Object, Group)

Then Edit, Clone, Create Tiled Clones again.
Symmetry is P1
1 Row, 30 Columns

Shift Tab:
Shift: X Per Column is -100% (that's minus)
Shift: Y Per Row is -100% (minus)

Scale Tab:
50% Random on both Shift Y and Shift X

Rotation Tab:
Angle: 20 degrees Per column

Color Tab:
H: 50% random

Fiddle with the settings to get different explosions.

Reference for explosion:
In Inkscape - Help, Tutorials, Tips and Tricks

Inkscape Tutorials, Videos

Some Inkscape tutorials I want to reference here.

Swirly curls in Inkscape
This one is not for newbies. I found it difficult to follow until I had learned more about Inkscape.

Inkscape Blur FilterTut
Haven't worked thru this one yet.

Videos:
Photo Popout
And more at that link. I think he's a convert from WindowsXP to Linux Ubuntu.

Interesting to watch someone work in Inkscape.
I found out another way to skew--if an object is converted to Path, the Node Tool will skew.
With a photo, though, I think you have to make it a pattern, use it as a fill for an object then convert the object to path. That's the way it is on the video anyway.
I never thought of making a pattern of a picture and using that instead of the picture.
(See Help, Tutorials, Tips and Tricks.)
(Automate it: File, Inkscape Preferences, Misc, Uncheck Import Image as Bitmap.)

The pattern within rectangle behavior is different with the Node Tool than the Select Tool.
Resize with Select tool, the pattern is fixed.
Resize with the Node tool, the pattern is dynamic. Can rotate the pattern within the rec with that little, ah...round nodule whatchamacallit. :)

I did run into glitches with the Windows version of Inkscape again, so I couldn't finish the tut.
Path, Union makes the pattern flip around inside its rectangle. It looks like the pattern is sliced and flipped sometimes. Other times just flipped. Path, Exclusion does this too. Maybe anything under the Path menu? It doesn't matter what Tool either.

NOTE: Selecting both objects in Windows version is Shift/click not Ctrl/click.
The key combos are different. I'm running into that quite a bit. Must be different versions of Inkscape use different keyboard combinations.

Friday, March 02, 2007

Inkscape - Paint Brush!


How to:
1. Draw a tiny circle/ellipse and keep it selected
2. Path, Object to Path
3. Effects, Modify Path, Add Nodes 0.1
4. Effects, Modify Path, Jitter 5 (Shift nodes & Use normal distribution checked, Shift node handles unchecked)
5. Draw a curvy line (I used the Freehand Tool)
6. Select both objects (circle, line)
7. Effects, Generate from Path, Pattern along Path
Single, stretched
Snake
Space between copies 4
Normal offset 4
Tangential offset 0
Pattern is vertical unchecked
duplicate the pattern before deformation checked

Gallery of effect:
Link
png

See previous post on Pattern Along Path

UPDATE:
See Inkscape Spiral posted 2011.

UPDATE2: Apr 2011 for Inkscape 0.48 Per Comments:

100% zoom.
Curvy Pencil line is about 200 px long.
Circle is 20x20 px in size. (Then Object to Path.)

Add Nodes:


Select circle with Select/Transform Tool and at the bottom Statusbar it tells you the number of nodes. I got about 634 nodes and that did the job. So don't worry about getting 1024 nodes. You want enough nodes to get the lacey/jagged/ragged edges on the circle when you add Jitter. Plus you'll be stretching that pattern onto a path.

Jitter:

Zoom in to about 500% to see what the edges of the circle look like. Should be jagged.

Note: Circle must be Top Most Object (Object, Raise to Top) when you select both circle and line and apply Pattern Along Path.

Here's a screenshot of Pattern Along Path setting that works (slightly different than above):


Refer to my update link above for further relevant notes applicable to Inkscape v 0.48.

Inkscape - Tools, Dropper Tool

The Dropper Tool or "pick averaged colors from image" doesn't work the way it's supposed to.
Ignore the tips on that one--online, on screen, within Inkscape, wherever.

Here's how it works in Windows version of Inkscape 0.45:

1. Select the object you want to modify
2. Click on the dropper tool
3. Pick alpha is checked, Set alpha is unchecked, at top screen toolbar (alpha = opacity)
5. DRAG on the color you want.

Alt/Drag gives the inverse color -- kinda weird, I thought, who wants the inverse color and what is it?

"Inverse" is the same thing as creating a negative image in graphic editors.
(Adjust, Color Balance, Negative Image in PSP9)
Get inverse color online here.

How to change stroke color? Didn't figure that out.

References:
Online Manual Dropper Tool

Tools in Inkscape with name and mouse hover popup text:


See Help, Keys and Mouse.